Disputes
Last updated: October 15, 2024
Disputes (also known as chargebacks) are an inevitable part of ecommerce. They arise when a customer queries a transaction with their card issuer. The issuer creates a formal dispute which immediately reverses the payment, debiting your account for both the payment amount and a dispute fee.
You can monitor and respond to disputes in the Dashboard.
Information
For how to manage disputes using the API, see Disputes API.
| Step | Status | Description |
|---|---|---|
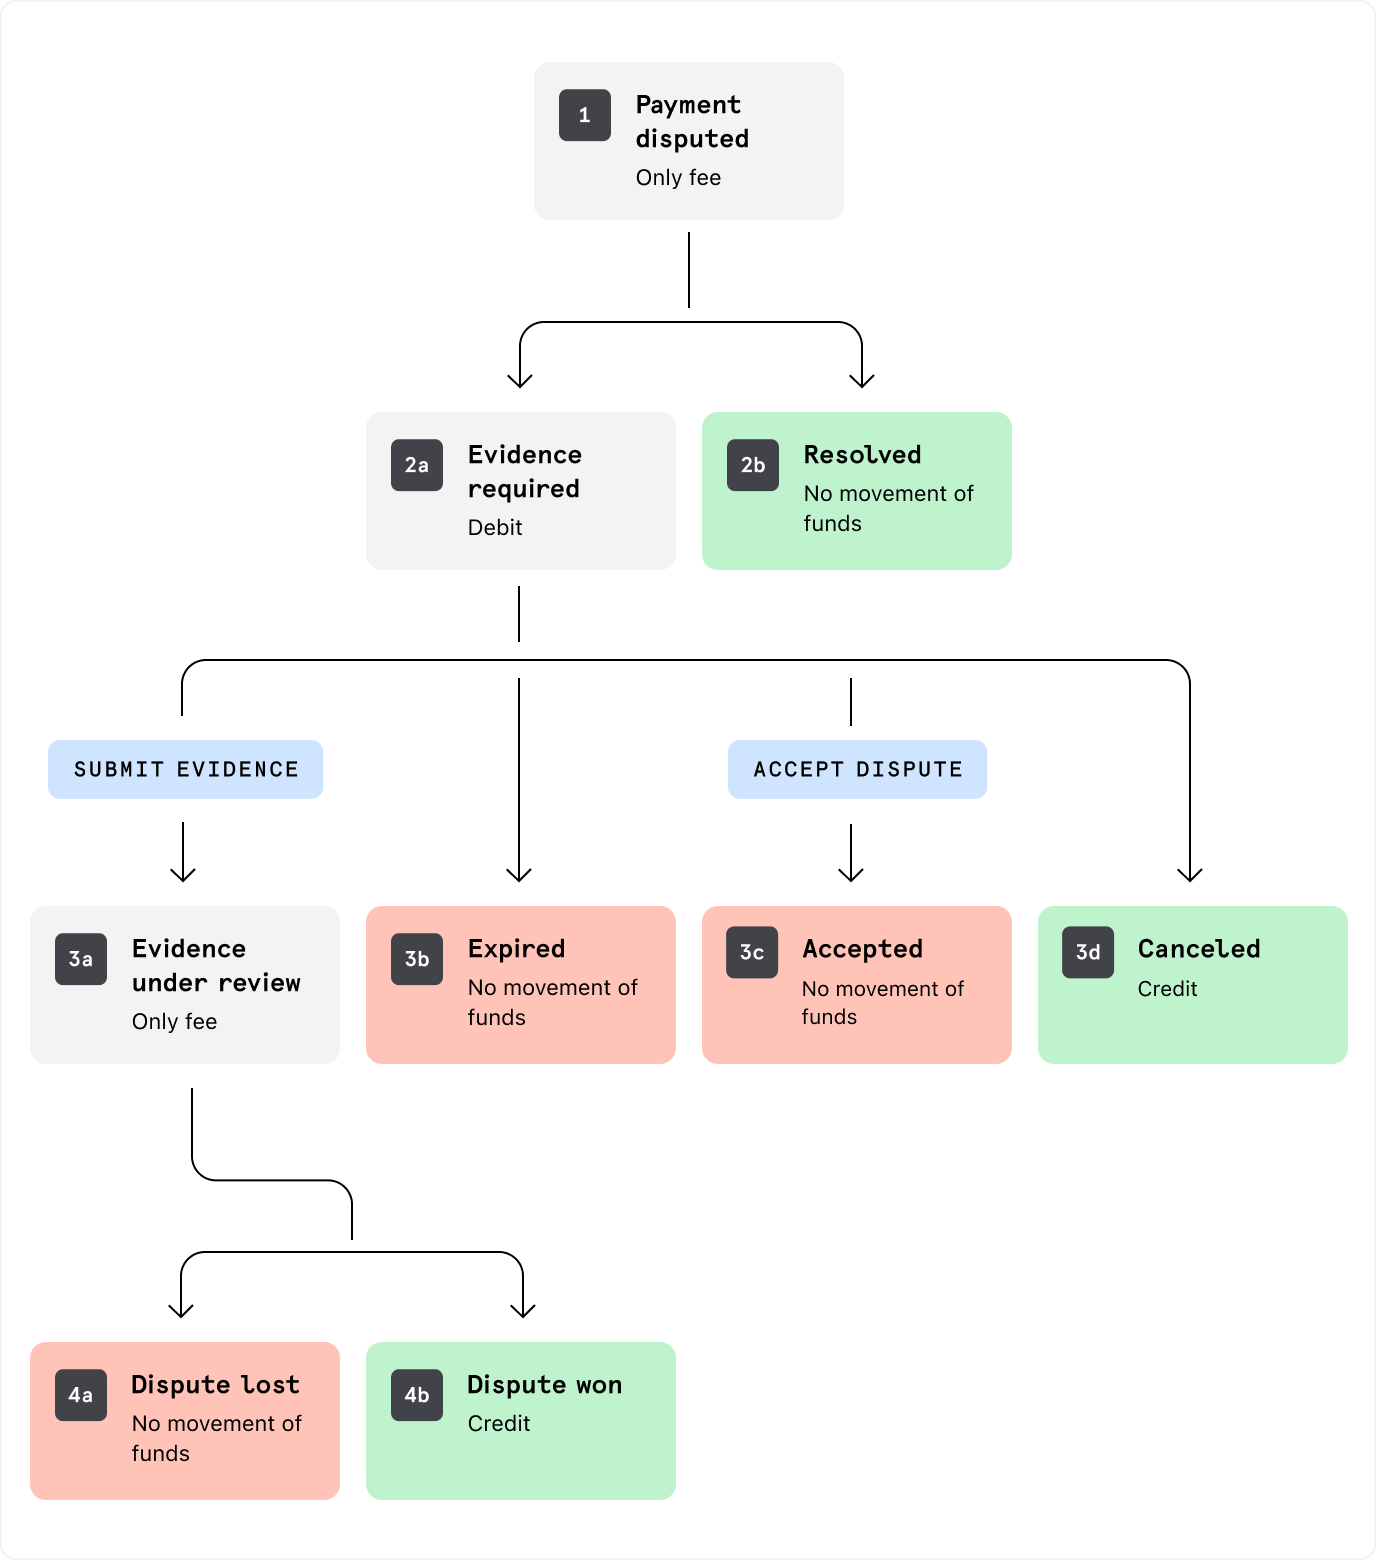
1 | Payment disputed | Your customer disputes the payment. This status does not appear in the Dashboard but is the starting point of all disputes. The only financial repercussion at this stage is a fee being charged. |
2a | Evidence required | You need to respond to the dispute. At this stage, your account is debited the disputed amount. |
2b | Resolved | We automatically resolve the dispute because it was already refunded. There are no further financial implications. |
3a | Evidence under review | You've submitted evidence to defend the dispute. Our Disputes team reviews your evidence and then sends it to the card scheme. No further action is required from you. |
3b | Expired | The time limit for you to respond to the dispute has elapsed. There is no further implication and you can no longer respond. |
3c | Accepted | You've accepted the dispute. No further action is required. |
3d | Canceled | The issuer canceled the dispute and your account is credited with the dispute amount. You do not need to take any further action. |
4a | Lost | The issuer rejected your evidence, and you lost the dispute. There are no further financial implications. |
4b | Won | The issuer accepted your evidence, and you won the dispute. Your account has been credited with the disputed amount. |
In the Dashboard, you can view disputes on both the Disputes page and the Payments page.
To view the Disputes page, you must have one of the following user roles:
- Admin
- Disputes manager
- Disputes operator
- Read only
- Risk manager
- Support manager
- A custom role with the
View unanswered and all disputes listspermission
- Sign in to the Dashboard.
- Go to Payments > Processing > Disputes.
The page has the following tabs:
This tab displays all disputed payments for which action is required.
For each dispute, it provides the following information:
- Dispute amount
- Status
- Reason for the dispute
- Payment ID
- Reference
- Initiated on date
- Expires in timer
To view the Payments page, you must have one of the following user roles:
- Admin
- Compliance operator
- Developer
- Disputes manager
- Read only
- Risk manager
- Support manager
- A custom role with the
View and search for paymentspermission
- Sign in to the Dashboard.
- Go to Payments > Processing > All Payments.
You can search for a dispute using the dispute ID, payment ID, or any other relevant filter on the page.
The Status column displays a DISPUTED label, as well as the dispute status. For example, EVIDENCE REQUIRED.
If a customer makes a retrieval request, which means their bank asks you for details of the transaction to validate it, the payment has a RETRIEVAL REQUESTED label.
If you have a payment with a retrieval request against it, you can do one of the following:
- Contact disputes@checkout.com to respond to the request.
- Refund the payment directly from the Dashboard to avoid a chargeback.
To view the details of a disputed payment:
- Sign in to the Dashboard.
- Go to Payments > Processing > All Payments.
- On the All Payments page, select the payment to view the Payment details page.
- Under Payment timeline, expand the dispute stages to view the dispute details.
For Visa disputes, you can download the scheme case files in the Dashboard as follows:
- Sign in to the Dashboard.
- Go to Payments > Processing > All Payments.
- On the All Payments page, select the payment to view the Payment details page.
- On the Payment details page, under Payment timeline, by Scheme case files, select the Download icon.
You can either accept a dispute or challenge it and submit evidence. If you do not challenge within the time limit, you lose the dispute.
To check the time limit, you must have one of the following user roles:
- Admin
- Disputes manager
- Disputes operator
- Read only
- Risk manager
- Support manager
- A custom role with the
View unanswered and all disputes listspermission
- Sign in to the Dashboard.
- Go to Payments > Processing > Disputes.
- On the Disputes page, the time limit appears in under the Expires in column in the Unanswered tab.
If you think a dispute is legitimate, you can accept it.
You must have one of the following user roles:
- Admin
- Disputes manager
- Disputes operator
- Read only
- Risk manager
- Support manager
- A custom role with the
View unanswered and all disputes listspermission
- Sign in to the Dashboard.
- Go to Payments > Processing > Disputes.
- On the Disputes page, select the dispute to view the Dispute details page.
- On the Dispute details page, select Accept dispute.
No further action is required. The funds have already been debited from your account.
If you do not think a dispute is legitimate, you can challenge it.
You must have one of the following user roles:
- Admin
- Disputes manager
- Disputes operator
- Read only
- Risk manager
- Support manager
- A custom role with the
View unanswered and all disputes listspermission
- Sign in to the Dashboard.
- Go to Payments > Processing > Disputes.
- On the Disputes page, select the dispute to view the Dispute details page.
Note: If a payment has multiple disputes raised against it, select the ID of the specific dispute you want to challenge. - On the Dispute details page, select Submit evidence.
- On the Disputes form that opens, upload your files in either JPEG, PDF, or PNG format.
- For each file you upload, select the evidence type.
- To save your progress and return to the form later, select Save and continue later. The dispute status remains as
EVIDENCE REQUIRED. - When you’ve uploaded all the required evidence, select Submit evidence.
Note
- The evidence you submit must be relevant to the dispute reason and met the scheme's file requirements.
- The form outlines the recommended type of evidence for your dispute. Alternatively, select General to see all possible evidence types.
- You can only upload one file per evidence type.
- You do not have to submit every evidence type.
Information
Visa Compelling Evidence 3.0 enables you to submit historical transactional data as evidence. For more information, see Support – What is Visa Compelling Evidence 3.0?.
When you’ve submitted your evidence, Checkout.com reviews the form and forwards the evidence to the card scheme.
The dispute status changes to EVIDENCE UNDER REVIEW.
Checkout.com recommends analyzing the evidence from previous disputes to gain insight into which types are more likely to win similar disputes.