Get started
Last updated: October 15, 2025
Flow is Checkout.com's pre-built payment user interface, which you can embed in your website to accept payments from your customers. Flow manages the end-to-end payment experience, including:
- Tokenizing sensitive payment details so they never reach your server
- Displaying available payment methods
- Capturing any additional customer data required
- Handling 3D Secure (3DS) authentication and redirection to third-party payment pages
Information
Use the following card details in the interactive demo to perform a test payment:
- Cardholder name: Jordan Smith
- Card number: 4242 4242 4242 4242
- Expiry date: 12/30
- Security code: 100
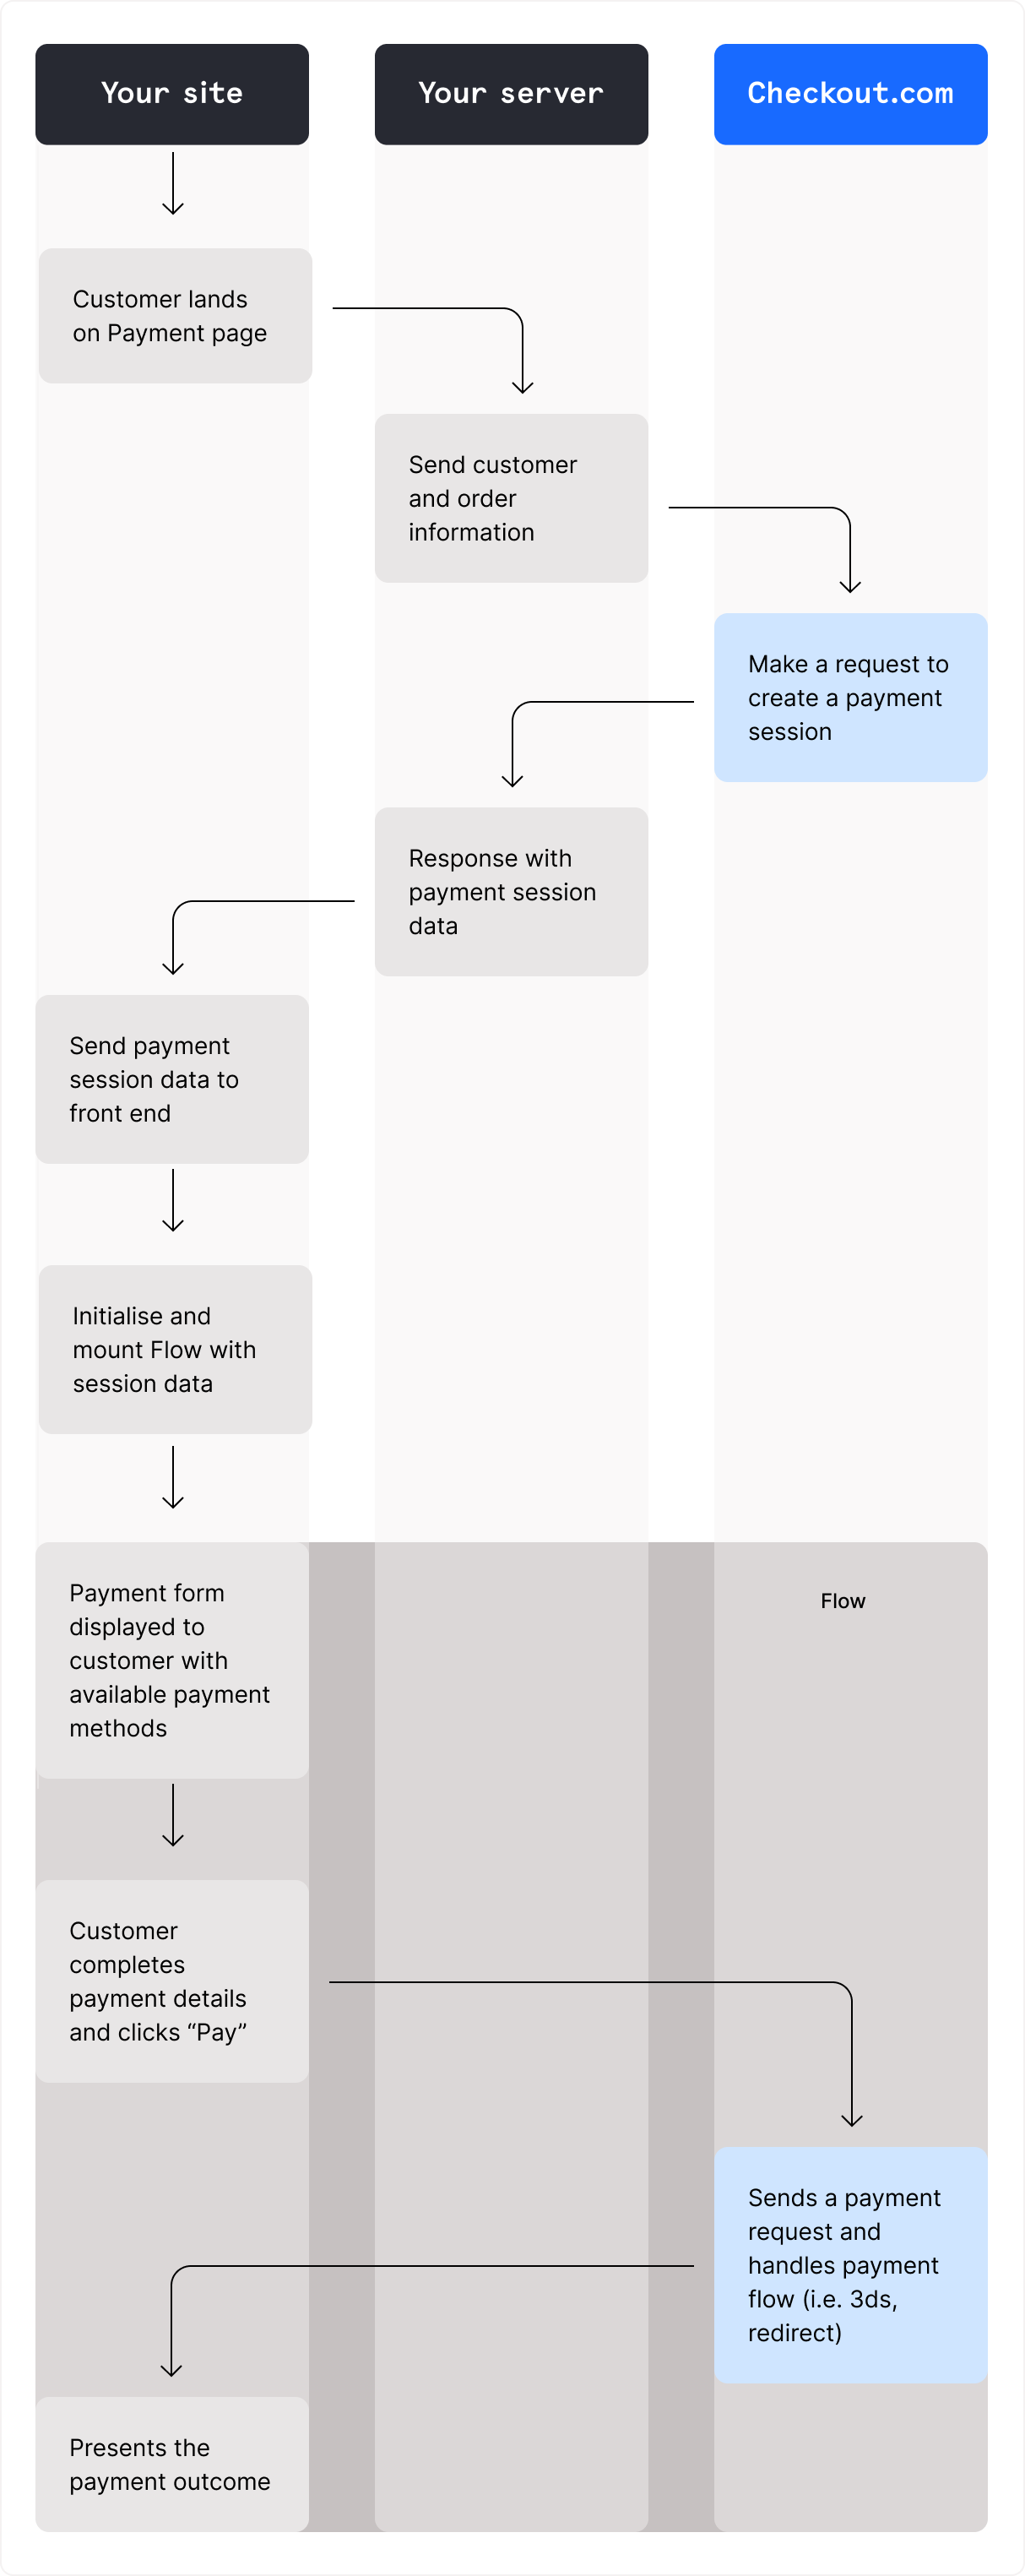
The customer lands on your checkout page.
You perform a server-side request to create a Payment Session.
You use the Payment Session data on the client side to mount Flow.
Flow displays the available payment methods to the customer. If the customer's chosen payment method requires additional customer data, Flow captures this from them.
When the customer selects Pay, Flow performs a payment request and handles any additional actions. For example, additional actions required for 3D Secure (3DS) authentication, or a third-party payment page redirect.
You receive a webhook notifying you of the payment status.
Make sure you have a test account with Checkout.com.
Create a public key and a secret key from the Dashboard, with the following key scopes:
- Public key –
payment-sessions:payandvault-tokenization - Secret key –
payment-sessions
To receive webhooks for the payment events, configure your webhook server.
When the customer is ready to pay, send a server-side request to securely create a PaymentSession object. The PaymentSession contains the information required to handle all steps of the payment flow.
Call the Request a Payment Session endpoint with your secret key.
Information
Some payment methods may require you to provide additional fields or specific values.
Information
Your base URL's {prefix} value is unique to your account and environment. To learn how to retrieve your base URLs for the sandbox and production environments, see API endpoints.
post
https://{prefix}.api.checkout.com/payment-sessions
The response determines which payment methods can be displayed to the customer, depending on the following:
- The customer's device
- The customer's region
- The values you provided for specific fields in your request
- The payment methods that are activated for your account
Information
To request to activate additional payment methods on your account, contact your account manager or request support.
You can install the @checkout.com/checkout-web-components package via npm:
Alternatively, you can load the package directly via a script:
Note
To remain PCI compliant, only ever load the script directly from https://checkout-web-components.checkout.com. Do not download or host the script yourself, or include it in a bundle.
If you use the template, you must set up your own server.
The client side initializes an instance of CheckoutWebComponents with configuration information and the payment session data returned in the Request a Payment Session response.
You can use the following configuration options to instantiate an instance of CheckoutWebComponents:
| JavaScript key | Description | Required |
|---|---|---|
| Your public API key, prefixed with | |
| The response from the | |
| Sets the customer's locale. Explicitly providing this value overrides the | |
| Sets the environment that the library should point to and send requests to. This can be one of:
| |
| Enables you to provide custom text translations for a natively supported languages, or add custom text for locales and languages not natively supported by Flow. For how to add translations, see Add localization to your Flow integration. | |
| Enables you to customize the visual appearance of the |
You can use CheckoutWebComponents to create flow. flow contains a dynamic list of all payment methods available for the payment session you passed into CheckoutWebComponents.
Mount Flow onto your website using the flow.mount() method. The method takes a Selector or an Element as an argument. For example, #flow-container or document.getElementById(#flow-container), respectively.
Note
You cannot embed Flow within an iframe or onto a Shadow DOM.
You can use Flow to handle payment methods that require a redirect (asynchronous payments), and those that do not (synchronous payments).
Some payment methods and 3D Secure authentication flows redirect the customer to a success or failure URL on your website, depending on the outcome of the payment.
Checkout.com sends you a webhook notifying you of changes to the payment's status. Wait for the webhook before you start your order fulfillment process.
Optionally, you can retrieve the payment result from your server. Call the Get payment details endpoint, and provide the cko-payment-id as the {id} path parameter. For example:
Payment methods that do not require a redirect raise an onPaymentCompleted event when the payment is successfully completed. You can use this to notify the customer of the payment status.
We send you a webhook notifying you of changes to the payment's status. Wait for the webhook before you start your order fulfillment process.
Optionally, you can retrieve the payment result from your server, with a Get payment details request.
Use test cards to simulate different payment flows and ensure your integration is set up correctly and behaving as expected.
You can check the payment's status on the Payments page in the Dashboard.