WooCommerce
Last updated: January 28, 2026
From downloading the plugin to requesting your first test payment, learn how to get started with the Checkout.com for WooCommerce plugin.
Information
This guide assumes you have already set up WooCommerce on your WordPress instance.
Note
To start accepting an alternative payment method, Checkout.com must first enable it on your account. Contact your account manager or our Sales team to get started.
We currently support the following payment methods on WooCommerce:
- Card payments
- Apple Pay
- Google Pay
- AlipayCN
- AlipayHK
- Alma
- Bancontact
- Benefit
- Cartes Bancaires
- Dana
- EPS
- GCash
- iDEAL
- KakaoPay
- Klarna Debit Risk
- Klarna Payments
- KNET
- MB WAY
- Multibanco
- PayPal
- Przelewy24
- QPay
- SEPA Direct Debit
- Sofort
- stc pay
- Tabby
- Tamara
- Touch 'n Go
- TrueMoney
You must create a public and private key to configure the integration.
Additionally, you need a signature key to configure webhooks.
- Sign in to the sandbox environment in the Dashboard.
- Select the Developers icon in the top navigation bar, and then select the Keys tab.
- Select Create a new key.
- When you're prompted for which type of key to create, select Public API key.
- Give the API key a description to make it easier to identify in the future.
- Disable the Allow any processing channel setting.
- Select the processing channel you want to use for WooCommerce from the list.
- Select Submit to create the key.
Make a note of your public API key as you'll need it for a later step. You can view your public API key at any time after creation.
- Sign in to the sandbox environment in the Dashboard.
- Select the Developers icon in the top navigation bar, and then select the Keys tab.
- Select Create a new key.
- When you're prompted for which type of key to create, select Secret API key.
- Give the API key a description to make it easier to identify in the future.
- Under Scopes, select Default.
- Disable the Allow any processing channel setting.
- Select the processing channel you want to use for WooCommerce from the list.
- Select Create key.
- Copy your private API key securely. You'll need it to configure the plugin.
Note
For security, you cannot view the secret API key again after you've left the _Create a new key page. Ensure you copy its value securely before you exit or close the window.
Webhooks are notifications that we send when an event occurs on your account. For example, when a payment is captured. The WooCommerce plugin uses them to update order statuses.
You can configure a webhook in your WooCommerce settings.
- Sign in to WordPress as an administrator.
- In the left menu, select Plugins.
- Look for Checkout.com plugins. If you find one, select Delete, or select Deactivate and then Delete.
You can install the plugin in the following ways:
- Sign in to WordPress as an administrator.
- In your WordPress dashboard, go to Plugins > Add New.
- Search for Checkout.com Payment Gateway.
- Select Install Now.
- After the installation completes, you can see Checkout.com Payment Gateway in your list of installed plugins.
- Go to the WooCommerce plugin repository.
- Download the latest release of the plugin.
- Sign in to WordPress as an administrator.
- In your WordPress dashboard, go to Plugins > Add New.
- Select Upload Plugin > Choose file.
- Upload your downloaded ZIP file.
- Select Install Now.
- After the installation completes, you can see Checkout.com Payment Gateway in your list of installed plugins.
- In your WordPress dashboard, go to Plugins > Checkout.com Payment Gateway > Settings.
- Select Enable Checkout.com card payments > Quick Setup.
- In the Quick Setup screen, provide the following fields:
- Checkout Mode – Set to Flow.
- Environment – Set to Sandbox.
- Secret Key and Public Key – Set to your respective API keys.
- Payment Method Title – Set to the name you want customers to see at checkout. For example, Credit/Debit Card.
- Under Webhook Status, select Refresh Status to verify the webhook configuration.
- If the verification fails, select Register Webhook in Register New Webhook.
- Optionally, you can configure your preferred payment methods using the Enabled Payment Methods box.
If you want to configure payment methods later, see Add more payment methods. - Select Save changes.
- Go to your shop's public URL and add a product to your cart.
- Go to your cart then proceed to checkout.
- Enter the required billing details. We recommend using a real email address so that you can receive the order confirmation.
- Select the Checkout.com payment method.
- Enter the following card details:
- Number –
4242 4242 4242 4242 - Expiry date – Any future date
- CVV –
100
- Number –
- Select the terms and conditions box.
- Select Place order. You'll be redirected to the order confirmation page. If you entered a real email address in the billing details, you'll also receive an order confirmation email.
- Sign in to your WordPress account as an administrator.
- Select WooCommerce in the left menu. Your test order is displayed and has a status of
Processing. This indicates that the payment has been successfully captured and that your webhooks are set up correctly.
You can now either go live as is or extend your configuration.
For test cards and a range of possible scenarios, see Testing.
- Sign in to WordPress as an administrator.
- In the left menu, select Plugins.
- Select Settings under Checkout.com Payment Gateway.
- Select Quick Setup.
- In the Enabled Payment Methods box, select the payment methods you want to enable.
- Select Save changes.
You can integrate with Apple Pay in the following ways:
- To enable regular checkouts with Apple Pay, complete the Apple Pay for web requirements and enable it in the Quick Setup box.
- To configure express checkout with Apple Pay, follow the API only setup guide, and configure Apple Pay in the Express Checkout settings.
To test your integration, follow the Test Apple Pay instructions.
Enable Google Pay in Quick Setup to make it available on the checkout page using Flow.
If you also need Fast Checkout, configure Google Pay in the Express Checkout settings.
Enable PayPal in Quick Setup to make it available on the checkout page using Flow.
If you also need Fast Checkout, configure PayPal in the Express Checkout settings.
- Sign in to WordPress as an administrator.
- In the left menu, select Plugins.
- Select Settings under Checkout.com Payment Gateway.
- Select Card Settings.
- Set Use 3D Secure to Yes.
- Select Save changes.
3D Secure payments are now enabled on your account.
- Sign in to WordPress as an administrator.
- In the left menu, select Plugins.
- Select Settings under Checkout.com Payment Gateway.
- Select Card Settings.
- Set Payment Action to Authorize Only.
- Select Save changes.
Any payments received are authorized only. You must manually capture them within seven days, or they are automatically voided.
- In the Dashboard sandbox, select Payments > Processing > All Payments.
- Select the test payment. The Payment details page opens.
- Select Capture payment in the top right.
- Select Capture payment. The Status column on the Payments page is updated to say
CAPTURED. The totals on your Dashboard are also updated. - Sign in to WordPress as an administrator.
- Select WooCommerce in the left menu.
- Select your test order to display the order details. For example:

The order note confirms that your payment has been successfully captured.
With recurring payments, you can process shopper interactions for scheduled payments, such as subscription payments.
Note
To use this feature, you must be using WooCommerce Subscriptions to manage subscriptions within WooCommerce. See WooCommerce Subscriptions Store Manager Guide.
The Checkout.com WooCommerce plugin registers with payment events triggered by WooCommerce Subscriptions to support the following actions:
- Cancellation of a subscription
- Suspension of a subscription
- Re-activation of a subscription
- Change of amount for a subscription
- Change of date for a subscription
- Management of multiple subscriptions
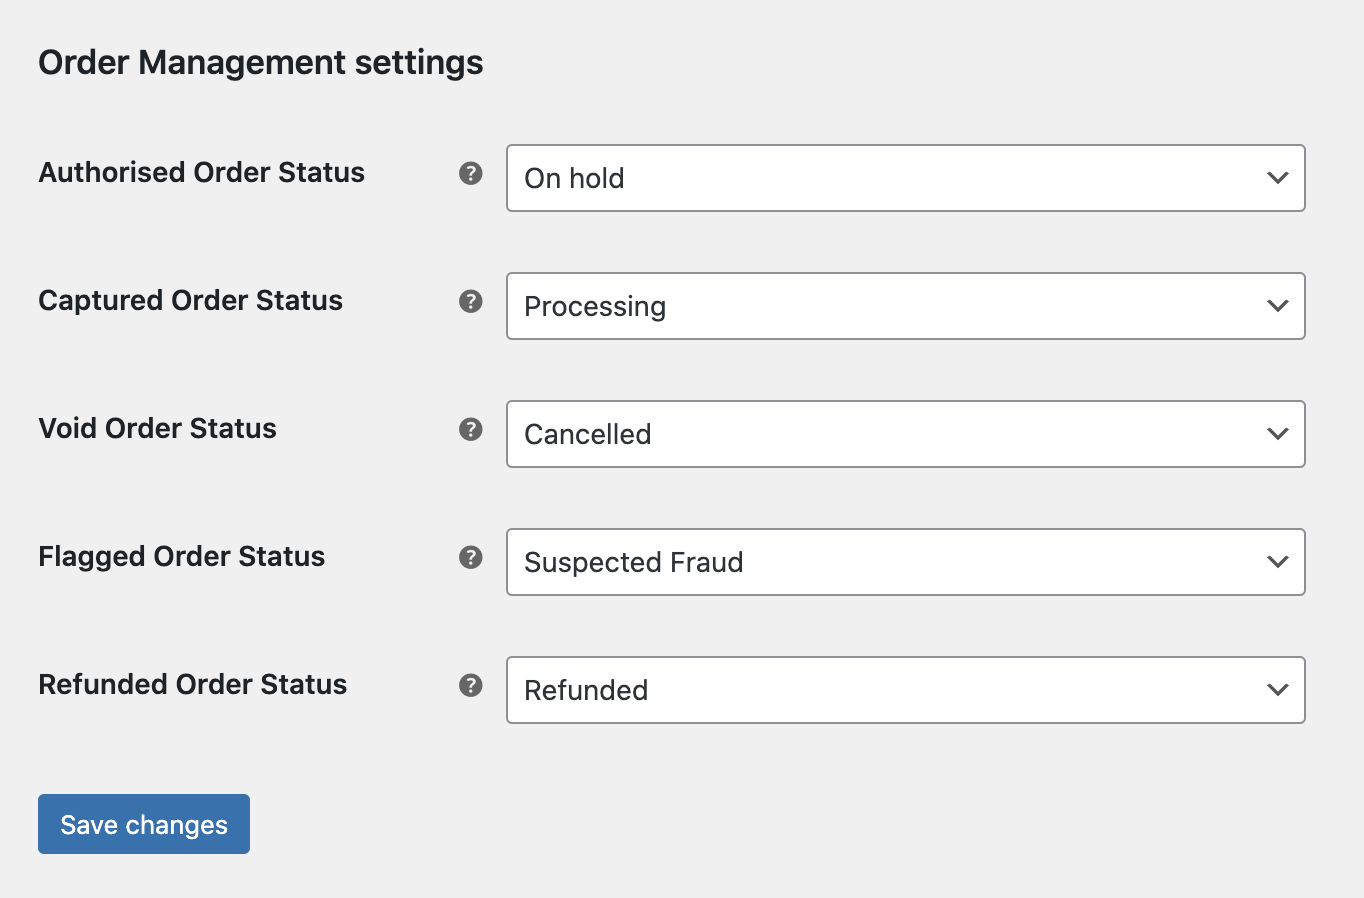
These settings allow you to edit the order statuses in line with the status of the payment. They are automatically set to WooCommerce's default values, so be aware that editing them may cause problems with the order flow.
To find these settings:
- Sign in to WordPress as an administrator.
- Go to WooCommerce > Settings > Payments.
- Find the Checkout.com plugin.
- Select Manage and then Order Settings.
When your testing is complete and you're ready to start accepting payments, contact our Sales team to move to a live account.