Apple Pay for Payment Setup API
Last updated: July 1, 2026
To process Apple Pay payments using the Payment Setup API, you need your own Apple developer account, and an Apple merchant ID.
See Apple's enrollment requirements for more information.
To set up Apple Pay, you need the following:
- An Apple developer account.
- A domain with a valid TLS certificate (your domain must start with
https). - Access to a Secure Shell (SSH) terminal.
- Access to upload files to your server.
To process payments on an app or on a website using the Payment Setup API, follow these steps:
- Create a merchant identifier with Apple.
- Create a certificate signing request.
- Create an Apple Pay payment processing certificate.
- Upload the signed payment processing certificate.
- Register a merchant domain.
- Create your Apple Pay certificate and private keys.
- Test Apple Pay certificate and private key validity.
- Integrate Apple Pay.
- In your Apple Developer account, go to the Add Merchant IDs section, select Merchant IDs > Continue.
- Add a useful description, like
merchant ID for test environment. - Enter your desired Merchant ID name in the Identifier section. Use a descriptive name to indicate both the domain and the environment. For example,
merchant.com.mywebsite.sandbox.
Information
You must create separate merchant IDs for your sandbox and production environments.
To create a certificate signing request (CSR), call the Generate a certificate signing request endpoint.
Information
Your base URL's {prefix} value is unique to your account and environment. To learn how to retrieve your base URLs for the sandbox and production environments, see API endpoints.
post
https://{prefix}.api.checkout.com/applepay/signing-requests
You can use the protocol_version field to specify whether to use the EC or RSA protocol for the CSR encryption.
- On your desktop, create a new plain text file and name it
cko.csr. - Paste the entire value returned in the response's
contentfield into the newcko.csrfile and save it. For example, yourcko.csrfile's contents look similar to the following:
Information
The CSR has a Time to Live (TTL) period of 24 hours. You must create your Apple Pay payment processing certificate within this time frame. If you miss the TTL period, you must generate a new CSR.
- Sign in to your Apple Developer account, go to the Merchant IDs list section, and select the Merchant ID you created earlier.
- In the Apple Pay Payment Processing Certificate section, select Create Certificate.
- Respond No to the question about processing in China and select Continue.
- Upload the
cko.csrfile from the previous step and select Continue. - Select Download to retrieve your payment processing certificate. The certificate file name is
apple_pay.cer.
- Encode the
apple_pay.cerin base64 using the following command.
- The command creates a new file with the name
base64_converted.cer.
To enable Checkout.com to use the payment certificate to decrypt Apple Pay tokens and convert them to our card tokens, call the Upload a payment processing certificate, and set the content field to the content of the base64_converted.cer file.
Information
Your base URL's {prefix} value is unique to your account and environment. To learn how to retrieve your base URLs for the sandbox and production environments, see API endpoints.
post
https://{prefix}.api.checkout.com/applepay/certificates
Information
Your domain must have a valid TLS certificate.
To display the Apple Pay button in your site, you must register and verify all top-level domains and subdomains where you display the button. This step is necessary if you're processing Apple Pay in a webpage.
- Sign in to your Apple Developer account, go to the Merchant IDs list section and select the Merchant ID you created earlier.
- Under the Merchant Domains section, select Add Domain.
- Enter your domain and select Save.
- Select Download and you get a
.txtfile. - Upload this file to your server so it's accessible at the following location (replacing
yourdomain.comwith the URL of your domain):https://yourdomain.com/.well-known/apple-developer-merchantid-domain-association. To do this, create a folder called.well-knownin the root directory of your website and put the.txtfile in that folder. - Once you've uploaded the file, select Verify.
- Open a terminal and create a
.csrand.keyfile using the following command:
- In the prompt, enter your details, and when asked for a password, leave it blank and select Enter. The command generates two files:
uploadMe.csrandcertificate_sandbox.key. - Sign in to your Apple Developer account, go to the Merchant IDs list section and select the merchant ID you created earlier.
- Under the Apple Pay Merchant Identity Certificate section, select Create Certificate.
- Upload the
uploadMe.csrfile you just created from your terminal. - Select Continue and then select Download to get your
.cerfile. The file is typically namedmerchant_id.cer. - Convert this
.cerfile into a.pemfile so you can use it in your code. Enter the following command in your terminal:
Validate your Apple Pay certificate and private key files by requesting an Apple Pay payment session:
After completing the previous steps, you now have the following:
- An Apple merchant ID (for example,
merchant.com.mywebsite.sandbox). - Checkout.com linked to your merchant ID.
- A domain verified by Apple.
- A
.keyand a.pemcertificate file.
Information
If you use an ecommerce platform where we support Apple Pay, such as Magento or WooCommerce, the files and certificates you created are enough to complete your integration. Follow the instructions provided by your particular platform.
You can extract the billing address that the customer set up in their Apple Pay wallet for use in your payment requests.
Set the requiredBillingContactFields: ["postalAddress"] parameter when you create the ApplePaySession on the front end.
If done correctly, the billing address is displayed in the Apple Pay payment sheet. To specify a different billing address that you have stored on file for the customer, add the billingContact object. For example:
The billing address is returned in the object in the onpaymentauthorized() callback, which you can send to your back end to include in your payment request to us.
You can extract the email address and phone number that the customer set up in their Apple Pay wallet for use in your payment requests.
Set the requiredShippingContactFields: ["phone", "email"] parameter when you create the ApplePaySession on the front end.
If done correctly, the email address and phone number are displayed in the Apple Pay payment sheet. To specify a different email address or phone number that you have stored on file for the customer, add the shippingContact object. For example:
The email address and phone number are included in the object returned in the onpaymentauthorized() callback, which is sent to your back end and included in your payment request to us.
Once you've completed the integration steps, you can display the Apple Pay button and validate an Apple Pay session.
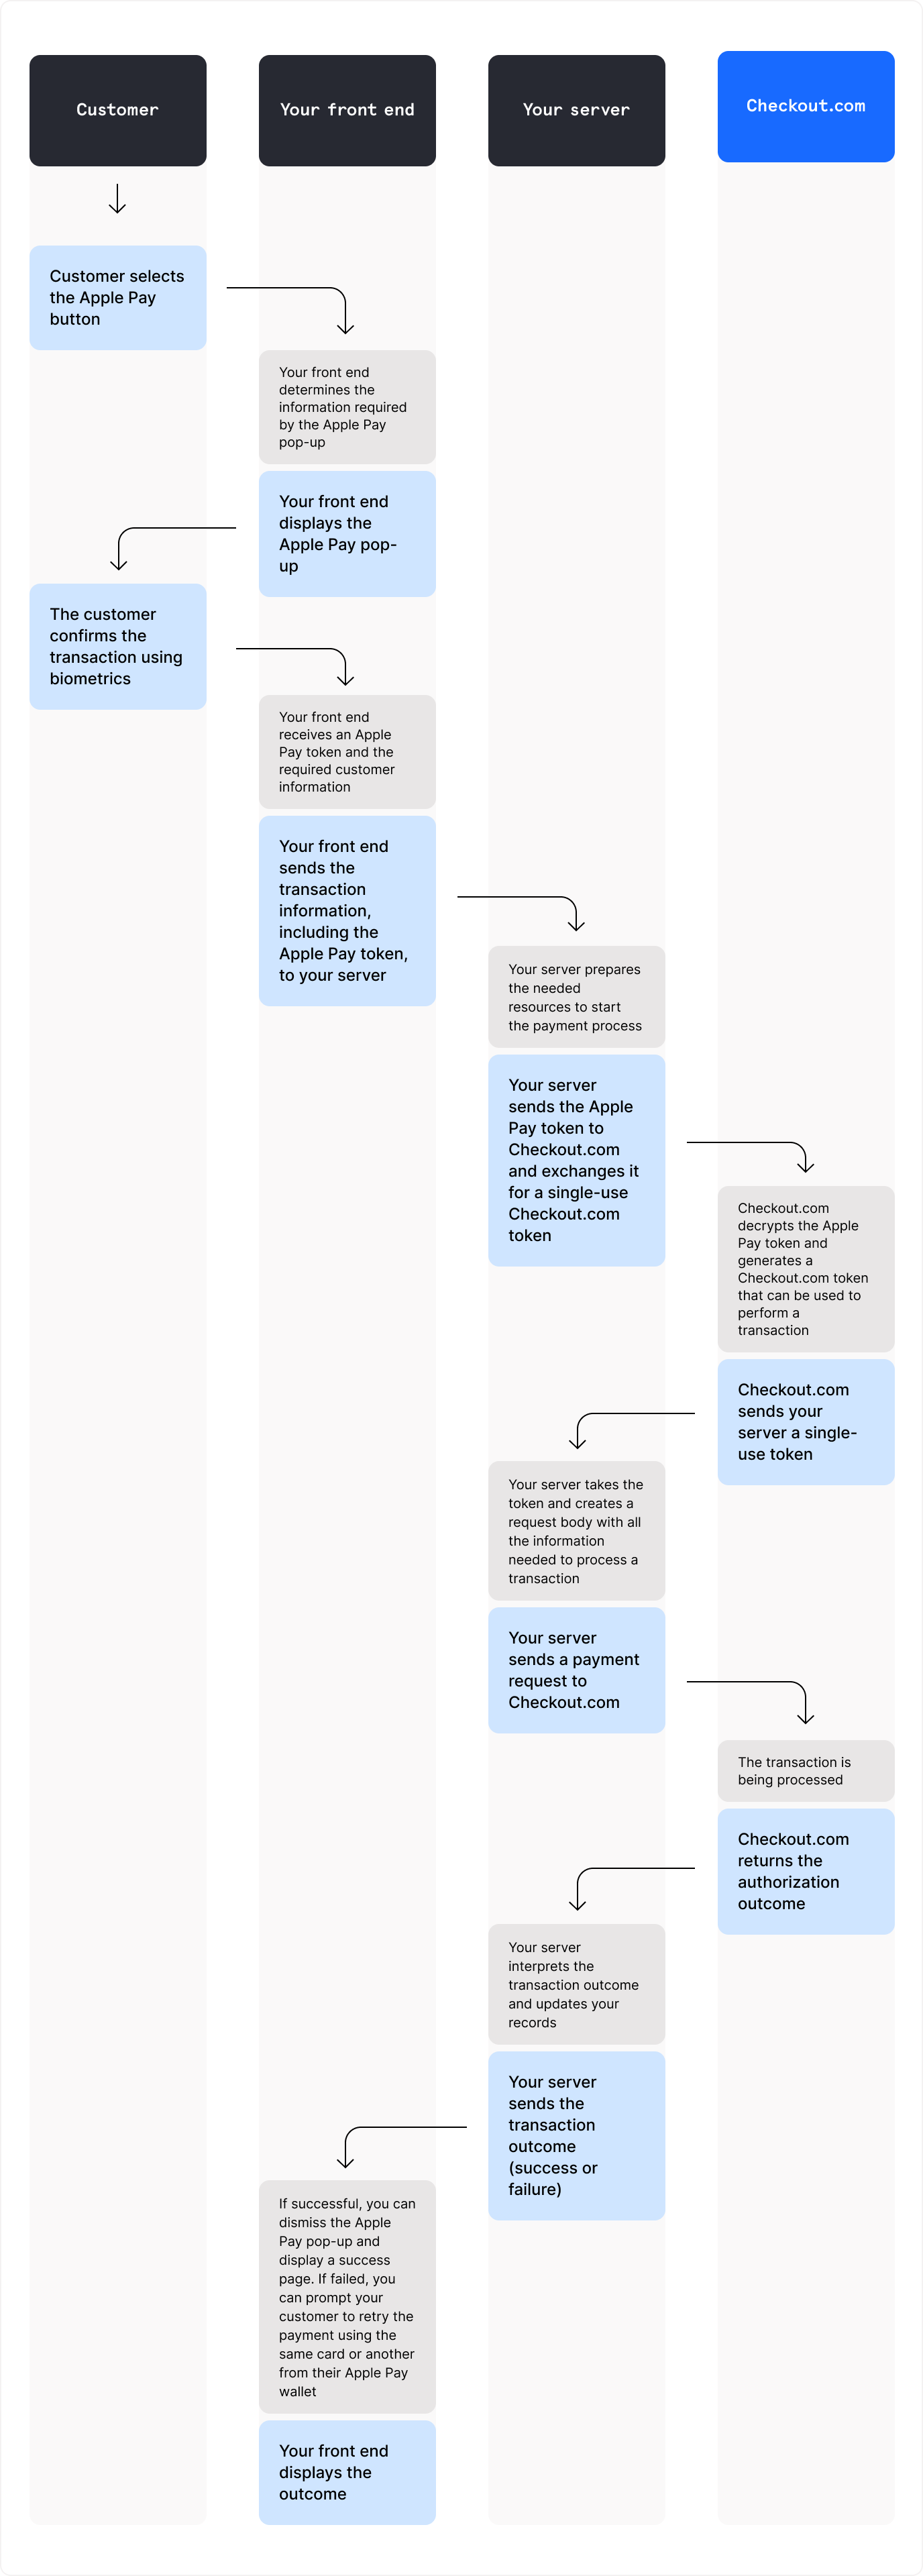
The following diagram shows a successful Apple Pay payment:
To accept Apple Pay payments, you must:
- Create a payment setup.
- Update the payment setup with the Apple Pay token.
- Confirm the payment.
Call the Create a payment setup endpoint.
Information
The Payment Setup API supports idempotency. You can safely retry API requests without the risk of duplicate requests.
Information
Your base URL's {prefix} value is unique to your account and environment. To learn how to retrieve your base URLs for the sandbox and production environments, see API endpoints.
post
https://{prefix}.api.checkout.com/payments/setups
In the request body, provide the following:
processing_channel_id– The processing channel's unique identifieramount– The payment amountcurrency– The payment currency
The response returns a payment_methods object, which contains the payment methods enabled on your account.
For Apple Pay, payment_methods contains the following fields:
status– The status of the payment method.flags– An array of error codes or indicators that highlight missing or invalid information.
When the customer selects Apple Pay as the payment method, Apple generates a payment token. To process a payment using the Apple Pay token, you can:
- Convert it to a Checkout.com card token
- Decrypt it and use the token data
Call the Update a payment setup endpoint to submit the token. Provide the following fields, depending on the token you use:
| Field | Description |
|---|---|
number | The payment amount, in the minor currency unit. |
string | Three-letter ISO 4217 currency code. |
string | The processing channel's unique identifier. |
string | The URL to redirect the customer after a failed authorization. |
string | The URL to redirect the customer after a successful authorization. |
object | The Checkout.com Apple Pay token. |
string | The token identifier, prefixed by |
string | The date and time at which the token expires. |
object | The Apple Pay account holder details. |
string | The account holder's first name. |
string | The account holder's last name. |
string | The account holder's middle name. |
string | Supported values:
|
boolean | Indicates whether to perform an account name inquiry with the card scheme (Visa or Mastercard). |
object | The customer's phone number details. |
string | The international dialing code for the customer's phone number. |
string | The customer's phone number. |
boolean | Set to |
string | The preferred card scheme for co-badged cards. Supported values:
|
The response returns a ready status when the token has been successfully validated. The payment is ready to confirm.
The response also includes a schemes array listing the card schemes associated with the card.
Some cards are enrolled in more than one card scheme, for example, a card that supports both Visa and Cartes Bancaires. When the customer uses one of these co-badged cards, the schemes field in the response lists the available schemes for that card.
To route the payment through a specific card scheme, set preferred_scheme when updating the payment setup. Supported preferred_scheme values are:
cartes_bancairesmastercardvisa
Information
If the card is not co-badged, or the requested scheme is not available for the card, Checkout.com ignores the field and processes the payment through the default scheme.
When the payment status changes to ready, confirm the payment by calling the Confirm a payment setup endpoint and provide:
- The payment setup
idas the{id}path parameter. applepayas the payment method name.
post
https://{prefix}.api.checkout.com/payments/setups/{id}/confirm/applepay